
For many landscape pros, there’s something satisfying about creating perfect stripes on a client’s lawn. Achieving this high-end look is as simple as bending the blades of grass in different directions and waiting for the sun to shine, which creates “light” or “dark” stripes. When blades of grass are bent away from the viewer, the stripe appears lighter in color because sunlight is reflecting off the long, wide part of the blade. When the blades of grass are bent towards the viewer, the stripe appears darker because the tips of the blades are less reflective. Mowing a lawn in rows of alternating directions provides visible stripe patterns.
Contractors can intensify lawn stripes by bending the grass even further, which can be done by using a roller or striper to press the grass to the ground. Stripe intensity also can be affected by the height of the cut. Shorter grass will have less distinctive stripes because shorter blades reflect less light. Increasing the height of a lawn by as little as ½ inch can make a noticeable difference in lawn stripe intensity.
Consider turf type when trying to achieve lawn striping, as certain breeds of grass bend easier and provide a better stripe pattern. Warm-season grasses are typically more difficult to stripe because they’re more rigid and harder to bend. Stripes are also affected by the position of the sun and may appear more intense at different times of day. Follow these steps to create different styles of lawn striping patterns.
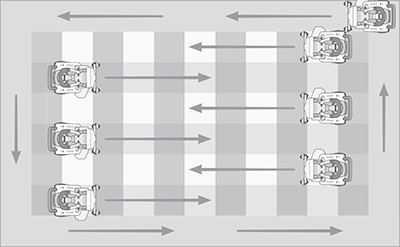
Pattern 1: Basic vertical

Begin by mowing the property’s perimeter. Next, mow the remaining property in rows of opposing direction, using a “Y” turn at the end of each row to reduce any turf damage. Mow the perimeter again for a polished look.
Pattern 2: Checkerboard
Begin by mowing the property’s perimeter. Using “Y” turns at the end of each row, mow the remaining property in vertical rows in opposing direction. Next, mow the lawn in horizontal rows in opposing direction. Mow the perimeter again for a clean look.
Pattern 3: Diagonal

This pattern is achieved using the same techniques as the “checkerboard” stripe pattern. Simply mow diagonally instead of vertically and horizontally.
Download a PDF version of this page for your own training, here.
Source: Scag Power Equipment, Scag.com | illustrations: David Preiss

